
4 Rules About
Photography
Before we plunge into the world of photography more deeply, we should know the basic of these photography techniques. Among them is that we must understand the rules about photography.
Here I will describe some rules in photography, including: Composition Line, Geometric Shapes, The Rule of Thirds, Framing Images.
1. Composition Line
The composition of the POI is how we put in the frame so that the concept of balance and simplicity going on there.
Line has an important role as one element supporting the theory of composition. Lines meant here who could have been formed from the angle and position the frame so that the line formed from actual objects, like trees, railroads, power lines and other objects that make up the line.
Lines can also provide an additional effect on the visual and emotional impact of the picture because:
- Additional lines can display a dynamic impression in photos
- A line of photo lovers invited to direct his attention to the area (POI)
- Lines can also create depth (depth) in a composition field.
- A line we can use as well as directions and orientation in the image, etc.
In addition, understand the theory of composition is important because such lines could invite a response from the audience of how photographs They feel and mood from conducting your photos, which then becomes a challenge, how we "use" and "use" lines to draw the attention of connoisseur photos.
For this type of line we can reply "use" in adding the composition of our picture frames include :
- Leading lines,
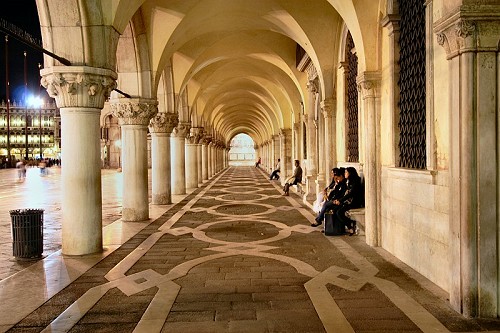
- Vertical lines,

- Horizontal lines,

- Diagonal lines,

- Curve lines,

- Perspective lines.

composition of several lines above each can cause different effects in the cause and evoke the mood for photos viewers.
2. Geometric Shapes
 With the position of the key aspects of the landscape at the corner of geometric shapes you can help create a balanced composition. Probably the most common and easiest way to do this is to use the 'triangle' forms between objects in an image with three objects in the frame is positioned with one for each side and one center. Geometric shapes used in this way is one technique to get a balance in the shooting to lead the eye into the photo shooting (in the same way with diagonal lines above rules).
3. The Rule of Thirds
 The Rule of Thirds will come out more often than others in all types of photography and is one of the first regulation of the composition is taught to students of photography. Although it sometimes feels a bit cliche this may also be a very effective technique in landscapes (although keep in mind that the breaking (and other rules) can also produce images that are dramatic and exciting). Key points in the landscape position is on the point of intersection between an imaginary 'third' dots in the picture and you will help provide balance to the images that you shoot an image focal point and help to really grab attention.
4. Framing Images
Many of us often put the photos in a frame, both frames as a means of displaying images (such as picture frames for wall hung, placed on a table / nightstand or other places), as well as limiting virtual frame image area with the photo paper / other print media .

 The benefit of framing the image include:
1. Giving context to the photo
2. Adding a message of the photo
3. Gives the impression of more than photos
4. Creating a point of view of photo
5. Attracting viewers of your photos.
Frame for a photograph can be obtained from any and all objects, including tree branches, mirror, shot through the window, from behind the fence, behind the foliage, behind the gate, even from the person's head and shoulders, and others.
The above rule is not a rule that must be applied in photography. Rules can be used as a material consideration in taking a picture. For me personally a good outcome is determined from the imagination and creativity of each individual. Hopefully this article helps: D