Navigasi

Showing posts with label photo. Show all posts

Tuesday, June 5, 2012

Compare Nikon D3S vs Canon EOS-1D Mark IV

nikon-d3s-vs-canon-eos-1d-mark-4

Compare Nikon D3S vs Canon 1D Mark IV
Nikon vs Canon, when they launched the most advanced and latest digital SLR cameras. As usual, when one of the launching of new products, then another one soon followed. This time it launched the first Nikon D3 successor version with a video feature called D3S and was followed the next day with new products from Canon EOS 1D mark called IV. Both are big DSLR with an integrated vertical grip, sturdy material wrapped in a magnesium alloy body, and both are equipped with HD movie feature.

this time based on the results of tests conducted by the Rev. Digital TV. In the case of high speed between the Nikon D3s with Canon Eos 1D Mark IV almost has the same quality. Then the feature is also a bit similar, whereas it is clear in terms of different colors ... D3s characters tend to be stronger in color while the Eos 1D Mark IV has a soft color results.


Both cameras are aimed for professional photographers, sports and journalism. As a professional camera, both of which offer very high sensor sensitivity up to ISO 102400.

Canon_eos1Dmark IV iso_12800
Canon_EOS_1Dmark IV iso_12800
Nikon D3S iso 12800
Nikon D3S iso 12800
Nikon D3S vs. Canon EOS-1D Mark IV Image Quality
The Nikon has a 12-megapixel sensor and the Canon has a 16-megapixel sensor. Looks like the Canon is better, right? Not so fast. The Nikon’s larger, full frame sensor and lower resolution means it has bigger pixels – much bigger (8.45 microns compared to the Canon’s 5.7 micron pixels). Bigger pixels mean less noise and one of the main specs both camera makers are pushing is high ISO sensitivity. Nikon has published sample images at ISO 6400 and they look wonderful. Canon has yet to publish any 1D Mark IV sample images but with about 30% less surface area on each 1D pixel, they’ll be hard pressed to match the low noise of the D3S.




The new CMOS sensor on the Canon EOS 1D Mark IV is still using the standard APS-H. Standard sensors are only used on professional SLR digital cameras are Canon's own 1.3x crop factor. Therefore, the EOS 1D Mark IV is not included as a full frame camera.

Significant changes are also done on the autofocus system. Autofocus system on the EOS 1D Mark IV evolved into a 45-point AF sensor with 39-point AF sensor in which a cross type sensor. EOS 1D Mark III only uses 19-point cross-type AF sensor type. Cross-type sensors are not centered in the middle of the camera alone, but spread evenly across almost the entire surface of the camera sensor. Thus, the focus distance can be determined more accurately.

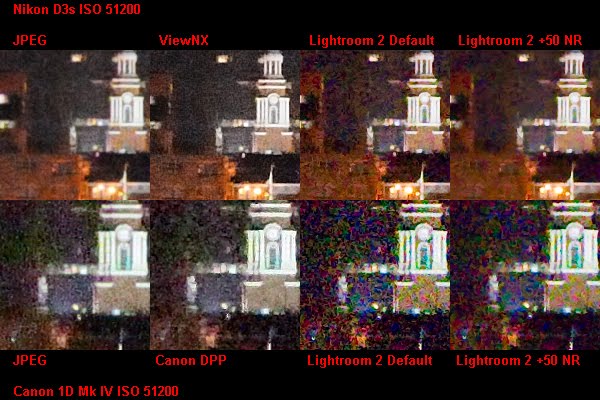
In terms of high sensitivity at high ISO, the EOS 1D Mark IV capabilities competing with Nikon D3s. Both have the highest sensitivity up to ISO 102,400. However, the images taken at ISO 102,400 is quite impressive. If both are compared, the characters that appear in the image noise at high ISO fairly close together. ISO 3200 for quality of images produced for the EOS 1D Mark IV and Nikon D3s, as well. When using the ISO 6400, Nikon a little lead. However, the performance is quite inappropriate given the positive appreciation.

In terms of color accuracy, the results from the EOS 1D Mark IV is taken with auto white balance mode under daylight type of light source of a slight deviation of 6.8 DeltaE. Accuracy is slightly below the Nikon D3s. In kualita images, Nikon D3s superior to the Canon 1D Mark IV, but the EOS 1D Mark IV has an effective resolution of 16.1 Megapixels. With higher resolution it is able to cover up a little short on the EOS 1D Mark IV held in picture quality. EOS 1D Mark IV can perform continuous shooting speed of 9.7 fps.

Compare Nikon D3S and Canon EOS-1D Mark IV Camera Specs

 Nikon D3S  Canon EOS-1D Mark IV
 Sensor type  Full frame CMOS  APS-H CMOS (1.3x crop factor)
 Resolution  12.1 megapixels (4256 x 2832)  16.1 megapixels (4896 x 3264)
 Pixel size  8.45 microns  5.7 microns
 Sensitivity  ISO 200 to 12,800 – expandable to ISO 102,400  ISO 100 to 12,800 – expandable to ISO 50 and 102,400
 Burst rate  9 FPS (max resolution, RAW)  10 FPS (max resolution, RAW)
 Auto focus system  51 points with 15 cross-type sensors  45 points with 39 cross-type sensors
 Flash sync  1/250th second  1/300th second
 Exposure bracketing  9 frames in 1/3, 1/2, 2/3 or 1 stop steps  7 frames in 1/3 or 1/2, stop steps
 Battery capacity  Approximately 4200 photos  Approximately 1500 photos

Compare Nikon D3S and Canon EOS-1D Mark IV Video Specs

 Nikon D3S  Canon EOS-1D Mark IV
 Video resolution  720p (1280 x 720)  1080p (1920 x 1080)
 Video frame rate  24 FPS  30, 24, 25 FPS at 1080p / 60 FPS at 720p
 Video focus control  Single-shot contrast-detect auto focus with live touch-up AF  Single-shot contrast-detect auto focus (pre-focus) or manual focus
 Video exposure control  Auto and aperture priority  Auto and full manual
 Stereo sound  With optional external stereo mic  With optional external stereo mic
 Video file format  .AVI  .MOV

Some interesting things from Nikon D3S:

  • FX format (full frame) but relatively low resolution of 12 MP alone (full frame DSLR other brands have reached level 24 MP) so noise can be reduced as low as possible and the highest ISO ISO 102.4000 is still appropriate.
  • suitable for the pro who needs to capture high speed, thanks to a 51-point AF and 9 fps burst mode.
  • capable of recording 24 fps HD movie, FX-sensitive sensor capable of recording video while the ambient light is very dim.

The main things that was introduced on the Canon EOS 1D Mark IV:
  • APS-H format (1.3x crop factor) resolution of 16 MP
  • 45 point AF with 39 cross-type manifold including
  • dual Digic IV processor with 14 bit AD conversion
  • 1080i HD movie recording with 24 or 30 fps
  • very fast with a 10 fps burst mode

a comparison of the above can be concluded that they all - each brand has its advantages and disadvantages of - respectively. Nikon 3DS has the advantage in picture quality even though the ISO Noisenya little high, but lacking in quality HD VIDEOS, while the Canon EOS 1D Mark IV has a deficiency in the quality of the picture because it has plenty of noise in high ISO, while have a great quality in HD Video.

Thursday, November 10, 2011

Lens Size Make Some Different

Everyone has at some point had the same problem: no matter how much you try to be consistent with your camera face, some pictures look great and others look awful.
The difference is in the level at which each lens distorts the natural image, bending light so that the three-dimensional image is represented as a two-dimensional photo.


Depending on the lens' focal length, the image will deform and affect how the image looks in photos. The shorter the focal length, the more field of view you can capture. That's why something like a 'fisheye' lens (15mm) distorts objects dramatically.


A larger lens (say 350mm) will flatten and widen the face of the subject. Experts say a 135mm lens would produce the best, most consistently accurate results. But even then there's an element of risk. If nothing else, you can now give your friends a decent excuse as to why you always look bad in holiday snaps.

Wednesday, October 5, 2011

Make unique photography with pinhole camera

" Did you know about Pinhole Camera ? What's Pinhole Camera ? "

Now in this article i wanna explain and gift example about Pinhole Camera.

WHAT IS A PINHOLE CAMERA?

A pinhole camera, also known as camera obscura, or "dark chamber", is a simple optical imaging device in the shape of a closed box or chamber. Basically a pinhole camera is a box, with a tiny hole at one end and film or photographic paper at the other. In one of its sides is a small hole which, via the rectilinear propagation of light, creates an image of the outside space on the opposite side of the box.


Pinhole cameras are small or large, improvised or designed with great care. Cameras have been made of sea shells, many have been made of oatmeal boxes, coke cans or cookie containers, at least one has been made of a discarded refrigerator. Cameras have been cast in plaster like a face mask, constructed from beautiful hardwoods, built of metal with bellows and a range of multiple pinholes. Station wagons have been used as pinhole cameras – and rooms in large buildings.

Pinhole photography is lensless photography. A tiny hole replaces the lens. Light passes through the hole; an image is formed in the camera. Pinhole cameras are used for fun, for art and for science.


PRINCIPLE AND CHARACTERISTICS OF PIN HOLE CAMERA

As mentioned above, the image in the pinhole camera is created on the basis of the rectilinear propagation of light. Each point on the surface of an illuminated object reflects rays of light in all directions. The hole lets through a certain number of these rays which continue on their course until they meet the projection plane where they produce a reverse image of the object. Thus the point is not reproduced as a point, but as a small disc, resulting in an image which is slightly out of focus. This description would suggest that the smaller the hole, the sharper the image.


The image created by a pinhole camera has certain characteristics which we won't find in classical lens photography. Another special characteristic is the infinite depth of field which, in a single photograph, allows objects to be captured with equal sharpness whether they are very close up or far away.

The pinhole camera takes in an extremely wide angle. The rays of light, however, take much longer to reach the edges of the negative than the centre, thus the picture is less exposed along the edges and therefore darkens.

A certain disadvantage of the pinhole camera is the amount of light allowed through (small aperture), which complicates and sometimes prevents entirely the photographing of moving subjects. Exposure time is normally counted in seconds or minutes but, in bad lighting conditions, this could be hours or even days (see Determining exposure times for pinhole cameras).


Pinhole images are softer – less sharp – than pictures made with a lens. The images have nearly infinite depth of field. Wide angle images remain absolutely rectilinear. On the other hand, pinhole images suffer from greater chromatic aberration than pictures made with a simple lens, and they tolerate little enlargement.

Exposures are long, ranging from half a second to several hours. Images are exposed on film or paper – negative or positive; black and white, or color.

Pinhole optics, by the way, are not only used in photography. There is one animal in nature which uses a pinhole for seeing – the mollusk Nautilus. Each eye has an accommodating aperture – the aperture can enlarge or shrink. In this drawing, originally taken from a book published by Arthur Willey in 1900, the eye is the oval opening to the upper right.

This sample result of Pinhole Photography :


LETS MAKE OWN PINHOLE CAMERA

After We know about what is pinhole camera and know about the principle and characteristic, now lets do some experiment to make own pinhole camera. For tutorial you can watch for video below :


for other tutorial you can visit :


Formulas

According to Eric Renner at least 50 charts suggesting optimal pinhole diameters have been devised in the last 125 years (Renner 1995:118). In my own reading the last six years I have come across about fifteen charts or formulas, a few of which may be derived from the same basic formulas. It should be noted that the diameter of the pinhole is not really critical. But for every focal length there is an "optimal" diameter, i.e. a diameter which produces the sharpest possible image. The word optimal actually is not a felicitous term, since the pinhole photographer or artist may not be striving for the greatest possible sharpness. There are beautiful pinhole images which are intentionally softer than what is technically possible. A good pinhole image is something else than a blurred, out of focus, lens image.
Up to a certain point a small pinhole will produce a sharper image than a larger one. If the pinhole is too small, the image gets less sharp because of diffraction. The hole should be perfectly round, without ragged edges. It may be checked with a magnifier or an enlarger.
Joseph Petzval of Vienna apparently was the first, in 1857, to attempt to find a mathematical formula of the optimal pinhole diameter for the sharpest definition in a pinhole image. The British Nobel Prize winner Lord Rayleigh (John William Strutt, 1842–1919) worked on pinhole diameter formulas for ten years and published his work in Nature (1891). Lord Rayleigh's formula is still one of the formulas used to today. A number of others have been published since the 1880s.
Lord Rayleigh's formula for subject distances above 1 meter may be written as follows:
d = 1.9 * sqrt (l * f),
where d = pinhole diameter, l = wavelength of light and f = focal length or distance from pinhole to light-sensitive material.
For the wavelength of light different average values may be substituted. Often the value of the yellow-green spectrum is used, i.e. 0.00055 mm.
According to Renner (1995: 117) most formulas used today are of the following general form:
r = sqrt (l * c * f)
r = pinhole radius
l = wavelength of light
c = a constant, usually a decimal fraction between 0.5 and 1
f = focal length
Platt (1989:73) provides the following optimal pinhole formula:
d x d = f/k, where k is a constant of approx. 1300
Dobson (1991) provides this formula:
d = sqrt (f)/25
Lord Rayleigh's formula and those published by Platt and Dobson all give somewhat different results. Andrew Davidhazy of the Rochester Institute of Technology lists several other formulas in a posting on the net.
Four, slightly different, charts of optimal pinhole diameters are reproduced below. Some of the charts have been simplified by leaving out references to needle numbers. Holter's chart, published in Norwegian, has been translated by me. Platt's chart differs from the others by consistently giving smaller apertures.

Bogre (1988)


Focal length Best aperture diameter Equivalent f-stop Exposure factor for f/22
50 mm 0.29 mm f/174 63 x
75 mm 0.35 mm f/213 94 x
100 mm 0.41 mm f/246 125 x
125 mm 0.45 mm f/275 157 x
150 mm 0.50 mm f/203 188 x
200 mm 0.57 mm f/348 250 x
250 mm 0.64 mm f/389 313 x
300 mm 0.70 mm f/426 376 x

Platt (1989)


Focal length (mm) Pinhole diameter (mm) f-stop
130 0.33 380
210 0.40 500
260 0.46 550
320 0.50 650
420 0.58 690
550 0.66 800
650 0.74 930
750 0.79 960
1000 0.91 1120

Holter (1990)


Focal length (mm) Pinhole diameter (mm) f-stop Exposure factor for f/16
10 0.14 70 20
20 0.20 100 40
30 0.24 125 60
40 0.28 140 80
50 0.31 160 100
60 0.34 180 125
70 0.37 190 140
80 0.40 200 160
90 0.42 214 180
100 0.45 220 190
150 0.54 280 300
200 0.63 318 400
250 0.70 360 500
300 0.78 380 560
350 0.84 418 700
400 0.89 450 800

Fuller (1992)

It should be borne in mind that for most purposes the diameter is not really critical, as the different values in the charts above may demonstrate.

If you wanna get accurate calculation you can try this software : PINHOLEDESIGNER 2.0 you can donwload Here
Program window for calculating the optimal diameter of the pinhole and optimal focal length.

Program window for calculating exposure times.


Wednesday, September 28, 2011

Profesional Cameras In Your Pocket With Sony NEX-7

Sony has announced the much leaked NEX-7 enthusiast-targeted mirrorless interchangeable lens camera. It packs a 24MP APS-C CMOS sensor and 2.4M dot OLED electronic viewfinder into its magnesium alloy body and yet still finds room for a pop-up flash and Alpha hot shoe. This unique combination of sensor and processor assures ultra-rapid shooting responses, plus flawless image quality with ultra-low noise when shooting still images or Full HD video. Extending from ISO 100-16000, the ultra-high sensitivity range makes it easy to capture clean, low-noise images in dimly lit interiors or at dusk. Responses are accelerated further by a shutter release lag of just 0.02 seconds – the fastest of any interchangeable lens digital camera in the world. Quick, precise AF is enhanced by new Object Tracking that keeps accurate focus lock on a selected target, even when it’s moving in the frame. The NEX-7 offers quick, easy control over creative settings via an intuitive new TRINAVI control. Two control dials on the top of the camera are complemented by a control wheel. 


Pushing the navigation button cycles quickly through various shooting modes, allowing enthusiasts to make custom adjustments and control images with the flexibility of a DSLR camera. The NEX-7 uses a new shutter arrangement, with an (optional) electronic first curtain. In other words, the camera no longer has to close the shutter then open it again to start the exposure, and according to Sony this decreases shutter lag from 100ms to just 20ms. This isn't completely new technology - Canon's live view capable DSLRs have been using it since the EOS 40D of 2007 - but it's very welcome to see it implemented in this type of camera. 


Further indication, if any were needed, of the NEX-7's serious intentions is provided by the co-announced Carl Zeiss-branded E 24mm F1.8 lens (also known as the SEL24F18Z). This offers a field of view equivalent to a 35mm lens on full frame, and places the NEX-7 squarely up against the likes of the Fujifilm FinePix X100 (with its fixed 23mm F2 lens), as well as the E-P3. The NEX-7 will also be sold with a black version of the standard E 18-55mm F3.5-5.6 OSS kit zoom. The NEX-7 will be available in November for $1350 with a 18-55mm kit lens or $1200 for the body alone. Meanwhile the NEX-5N will be available in September with the same kit lens for $700, or on its own for $600.


Basic Specifications
Resolution: 24.30 Megapixels
Kit Lens: 3.00x zoom
18-55mm
(27-83mm eq.)
Viewfinder: LCD
LCD Size: 3.0 inch
ISO: 100-16000
Shutter: 30-1/4000
Max Aperture: 3.5
Dimensions: 4.7 x 2.6 x 1.7 in.
(120 x 67 x 43 mm)
Weight: 14.6 oz (415 g)
MSRP: $1,350
Availability: 11/2011


The default assignments for the three Tri-Navi dials change depending on the shooting mode you're in. Here's a table listing assignments for each dial in each major camera mode:
Sony NEX-7 Default Tri-Navi Dial Assignments
Shooting Mode
Left Dial
Right Dial
Rear Dial
iAuto No Function No Function No Function
Program Auto Program Shift Exposure Compensation ISO
Aperture Priority Aperture Value Exposure Compensation ISO
Shutter Priority Shutter Speed Exposure Compensation ISO
Manual Shutter Speed Aperture Value ISO
3D Sweep Panorama Right/Left direction Exposure Compensation ? (prototype bug)
2D Sweep Panorama Right/Left-Up/Down direction Exposure Compensation ? (prototype bug)
Anti Motion Blur No Function Exposure Compensation No Function
Here are the dial assignments for each of the optional settings groups:
Sony NEX-7 Optional Tri-Navi Dial Assignments
Settings Group
Left Dial
Right Dial
Rear Dial
Focus Settings Focus Area Select Left/Right focus position Up/Down focus position
White Balance White Balance Preset A/B color adjust G/M color adjust
D-Range (DRO) Level (1-5) Exposure Compensation DRO Off/DRO/HDR
D-Range (HDR) EV Spread Exposure Compensation DRO Off/DRO/HDR
Creative Style Creative Style Selection Amount (+/-3) of parameter selected by rear dial Sharpness, Saturation, Contrast
Picture Effects No Function Select among options for current Picture Effect Choose Picture Effect (Miniature, Partial Color, etc.)
Custom (see below) (see below) (see below)
In Custom mode, you can assign any of 9 functions plus "Not Set" to any of the three dials. The only restriction is that you can't assign the same function to more than one dial. The nine functions that can be assigned to the control dials via the Custom option are:


Sony NEX-7 specification highlights

  • All-new 24MP APS-C CMOS sensor (shared with the SLT-A7 and A657)
  • ISO 100-16000
  • Built-in 2.4M dot OLED EVF with eye sensor
  • Electronic first-curtain shutter (cuts response time from 100ms to 20ms)
  • 'AVCHD Progressive' 1080p60 HD movie recording with built-in stereo mic
  • Tilting rear screen
  • Three-dial user interface
  • Built in flash and Alpha hotshoe
  • Infra-red remote control receiver
  • Microphone input socket
  • Exposure Compensation
  • Autofocus Mode
  • Metering Mode (pattern)
  • White balance preset (Auto, Daylight, etc.)
  • DRO/Auto HDR mode (Off/DRO/HDR, but also Off/ DRO Level 1-5, Auto HDR/ HDR EV spread 1-6)
  • Creative Style preset
  • Picture Effect
  • Quality (JPEG Fine/JPEG Standard/RAW/JPEG+RAW)
  • "Not Set (in case you don't want to assign any function to that dial)
    Bottom line, the NEX-7's new Tri-Navi interface offers more flexibility and configurability than anything we've seen to date on a Compact System Camera.


    The Sony NEX-7 is a Compact System Camera unlike any other yet produced. Up to now there has broadly been two types of CSC: DSLR style and compact camera style, the key difference between them apart from shape, being the inclusion of a built-in electronic viewfinder (EVF) in the former. The NEX-7 is a hybrid of the two styles. It takes the compact styling of the rest of the NEX range as a starting point, but blows it up in size and adds an EVF. In outward appearance its styling and sober black-only finish is reminiscent of M series Leicas and immediately conveys that this is a serious camera aimed at a different and more advanced audience that CSCs have targeted thus far. 

    Alpha Mount Adaptor
    One of the appeals of the NEX system is that its shallow body enables the attachment of adaptors for pretty much any lens mount. Sony's new LA-EA2 Alpha mount adaptor features its own translucent mirror and AF module so that any Alpha lenses attached to it behave like they do on Alpha cameras, with the superior phase detection AF. But with the right mount you can fit all kinds of lenses, both current and obsolete, and it is envisaged that the NEX-7 will be popular with owners of Leica M series lenses in particular.
    The NEX-7 we handled is an early pre-production model and we were not allowed to put an SD card in it to assess to image quality, as there's still some tweaking to be done to the firmware, but from a handling and usability perspective the NEX-7 is impressive. Its discreet form makes it an ideal street photographer's camera. The tilting 921k dot LCD screen facilitates candid shooting but the inclusion of that superb EVF, which we have already seen on the Alpha 77, makes it a great option for those who would never consider buying a camera without a viewfinder. 


    Adapter For Addition Lens
    Adapter with addition Lens

    Sony NEX-7 With Tele Lens

    Tuesday, September 13, 2011

    Macrophotography Tools & Equipment

    After studying macros photography, now I will discuss about the basic tools & equipment needed when performing techniques macro photography. Some tools are required when techniques macros are:


    1. CAMERA

    Basically all kinds of good analog camera, Pocket / digital prosumer, or DSLRs can be used for this purpose. But the SLR (Single Lens Reflex) camera either analog or digital techniques are preferred in macros,  
    why?
    Because we get what we see through view-finder, this will have a big impact if we was observed on a particular object that we want to immortalized in accordance with which we see.

    Look modern DSLR available now at market, which provides a preview DoF (Depth of Field Preview), is useful in Macrophotography especially for beginners who are still groping in the DoF.

    2. LENS

    The lens is vital for Macrophotography, because in science is all related to the precision is very determine the final outcome. Special lens or a more famous for its macro lens is the part that is not can be left out of the world Macrophotography seriously.

    Now many are provided with facilities zoom lens macros as well, for it required consideration carefull when selecting it, because after a zoom lens will never be as good as with a fixed focal length lens.

    What is the focal length is appropriate?
    Macros Lens available in the market is in the range:
    1. 50-60mm
    2. 80-105mm
    3. 135-200mm

    Range 1 is usually used for non moves object or tends to be static, because the distance required fairly close to the object.


    Range 2 is commonly used in Macrophotography, because it can be used for distance sufficiently "far away" to take photos of the shy / move / sensitive object to our presence.

    Range 3 is the most ideal for field work, Because the distance that a freely taken.

    3. ACCESORIES (LENS AND SPECIAL TOOLS)

    In addition to the camera & lens as a basic tool in macro shooting techniques, photographers also need additional accessories as a support in taking of images include:

    A. Stacked Lens

    Stacked Lens is a prime lens with a fixed focal length which later combined with the reversed lens to produce more than 1:1 magnification.

    Enlargement can be produced is by calculated as follows:

    MAGNIFICATION = FOCAL LENGTH of PRIME LENS (LENS STACKED): FOCAL LENGTH of COUPLED LENS (LENS Reversed)
    Example:
    Prime Lens: 200mm/f4
    coupled Lens: 50mm/f1.8
    Magnification = 200mm: 50mm = 4x (4:1)

    B. Reversed Lens (lens reversed)

    Reversed lens used if we want magnification (enlargement) is more than size life-size (1:1) with a very detailed quality awesome. From the experience of a prime lens 50mm / f 1.8 as the best option.

    C. EXTENSION TUBES & BELLOWS

    Entension Tubes (ET) or the now available Autofocus Extension Tubes (AET) and Bellows are Additional elements that are used to obtain enlargement of our wills in a way that combined with a prime lens.

    D. TELECONVERTERS or MULTIPLIERS

    Teleconverter (TC) is the element that is used for magnification combined with a prime lens, the figure optical up quite complex. Commercially available TC 1.4X and 2.0x TC. The use of TC will affect the light entry, resulting in a drop in the f-stop. At 1.4X TC, f-stop will drop to a stop; at 2.0x TC, drop to 2 stops.

    E. TRIPOD AND MONOPODS

    Use of Tripod or monopod if possible is absolute. Slightest vibration will affect the outcome of Macrophotography. For that Tripod will be very helpful at all.

    F. FLASH


    In unfavorable weather conditions or light less, the use of flash is absolute. Use Flash is good and true will produce images nice and natural. Flash used can be from a built-in flash on camera, external flash, modified or External Flash Special Flash for a more Macrophotography known as Macro-Flash.